Tuesday, November 19, 2024
Simple Plywood Boat Construction: Step-by-Step Guide
Simple Plywood Boat Construction: A Step-by-Step Guide
Building a plywood boat can be a rewarding and fulfilling project. It offers a chance to create something beautiful and functional from scratch. This guide will walk you through the essential steps for constructing a simple plywood boat, from design to finishing. While this guide provides a general outline, remember to consult specific plans and instructions tailored to the boat you choose to build.
1. Design and Planning
The first step is to choose a boat design that aligns with your skills, resources, and intended use. Numerous plans are available online and from boat-building suppliers. Consider factors like:
- Boat type: Rowboat, dinghy, sailboat, or kayak.
- Length and width: Determine the size that suits your needs and storage capabilities.
- Materials: Plywood thickness, wood type, and epoxy resin.
- Construction method: Strip planking, stitch and glue, or traditional lapstrake.
- Budget: Estimate the cost of materials, tools, and any necessary assistance.
Once you've selected a plan, study it carefully. Familiarize yourself with the terminology, dimensions, and assembly instructions. It's helpful to create a detailed bill of materials listing all the plywood sheets, lumber, hardware, and other supplies required.
2. Materials and Tools
2.1 Materials
- Plywood: Marine-grade plywood is essential for its water resistance and durability. Choose a thickness appropriate for the boat's size and intended use.
- Lumber: Depending on the design, you may need lumber for frames, stringers, and other structural elements. Select pressure-treated or marine-grade lumber.
- Epoxy resin: Epoxy resin is used for bonding plywood panels, sealing seams, and providing waterproof protection.
- Fiberglass cloth: Fiberglass cloth adds strength and rigidity to the hull. Use a weight appropriate for the design.
- Hardware: Purchase the necessary hardware, such as screws, bolts, cleats, oarlocks, and any other components required by the plan.
- Paint or varnish: Protect your boat's finish with marine-grade paint or varnish. Apply multiple coats for lasting protection.
2.2 Tools
- Power saw: A circular saw or jigsaw is needed for cutting plywood and lumber.
- Router: A router is helpful for shaping edges, creating rabbets, and adding decorative features.
- Sanding tools: Sandpaper, a sanding block, and a random orbital sander are used for smoothing surfaces and preparing for paint.
- Drill and drill bits: Use a drill for creating pilot holes and fastening components.
- Clamps: Clamps are essential for holding plywood panels and other parts together during assembly.
- Measuring tools: A tape measure, ruler, and protractor are needed for precise measurements.
- Other tools: A hammer, chisel, and safety glasses are also helpful for construction.
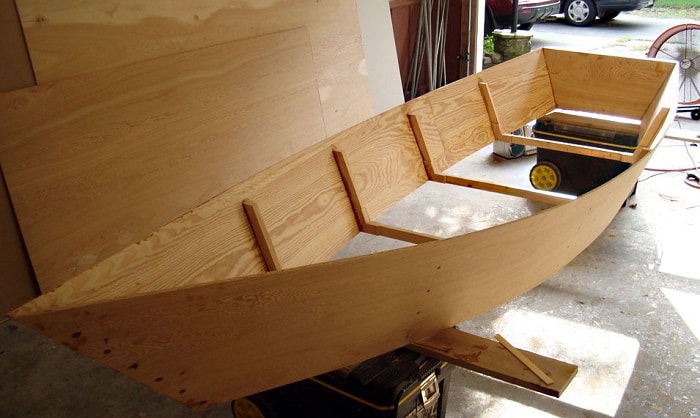
3. Building the Hull
The hull is the heart of your boat. Construction methods vary depending on the design, but the general steps involve cutting, assembling, and securing the plywood panels.
3.1 Cutting Panels
Use your chosen power saw to carefully cut the plywood panels to the dimensions specified in the plan. Mark the cuts accurately, ensuring they are straight and precise. Pay attention to grain direction, ensuring panels are oriented for optimal strength.
3.2 Assembling Frames and Stringers
If your design includes frames and stringers, assemble them according to the plan. These structural elements provide support and shape to the hull. Secure them using screws, bolts, or epoxy, depending on the instructions.
3.3 Bonding Plywood Panels
Apply epoxy resin to the edges of the plywood panels where they will join. Carefully align the panels and clamp them together. Ensure the joints are tight and even. Allow the epoxy to cure according to the manufacturer's instructions.
3.4 Adding Stiffeners and Reinforcements
Your plan may call for stiffeners, bulkheads, or other reinforcements to strengthen the hull. Follow the instructions for attaching these elements using screws, bolts, or epoxy.
4. Finishing Touches
Once the hull is assembled, it's time to add the finishing touches that give your boat its final form and functionality.
4.1 Sealing Seams
Thoroughly seal all seams and joints using epoxy and fiberglass cloth. This ensures a watertight hull and prevents leaks. Apply multiple layers of fiberglass cloth, allowing each layer to cure before adding the next.
4.2 Shaping and Sanding
Use a router or sandpaper to shape the hull's edges and create a smooth, rounded profile. Sand all surfaces to remove any rough edges or imperfections.
4.3 Adding Features and Hardware
Install any necessary hardware, including seats, oarlocks, cleats, and any other components specified in the plan. Secure these elements using screws, bolts, or epoxy.
4.4 Painting or Varnishing
Prepare the hull's surface by cleaning and sanding it thoroughly. Apply several coats of marine-grade paint or varnish to protect the wood and enhance its appearance. Allow each coat to dry completely before adding the next.
5. Launching and Enjoying Your Boat
Congratulations! You've successfully built your plywood boat. Now it's time to launch it and enjoy the fruits of your labor. Take it out for a test run, making sure it handles well and remains watertight. Remember to follow all safety precautions and boating regulations when using your new vessel.
Building a plywood boat is a challenging yet rewarding experience. With patience, precision, and a good set of plans, you can create a durable and functional vessel that will provide you with years of enjoyment on the water.
No comments:
Post a Comment
Note: Only a member of this blog may post a comment.